![eQuip Logo on White-1.png]](https://help.assetworksusa.com/hs-fs/hubfs/eQuip%20Logo%20on%20White-1.png?height=50&name=eQuip%20Logo%20on%20White-1.png)
Add Thumbnail Images through Importer To add asset images to multiple assets at once, you can use the eQuip importer. This is a two-step process:
Step 1 – Upload the Image Files Follow the steps below to upload your images into eQuip:
Use the image below as a guide for navigation and upload location:
Step 2 – Attach Images to Assets After uploading, the images are stored in eQuip but are not yet linked to assets.
Helpful Tip If you are unsure of the correct file name:
Alternate Option – Manual Attachments If you only need to add a few images, you can attach them manually:
Key Notes
Please feel free to reach out if you would like help reviewing your template before import. I’m happy to assist!
- Upload the image files into eQuip
- Attach them to assets using an import spreadsheet
Step 1 – Upload the Image Files Follow the steps below to upload your images into eQuip:
- Navigate to:
- Tools → Data Import
- In the pop-up window:
- Select Asset Import
- Locate the Asset Thumbnail Images section
- Upload your images using one of the following methods:
- Drag and drop your files into the green “Drop Files Here” box
- Or click Select to browse to your image folder
- To upload multiple files:
- Hold Ctrl to select individual files
- Or hold Shift to select a range of files
- Once the upload completes:
- Click OK on the confirmation message:
“Files uploaded successfully”
- Click OK on the confirmation message:
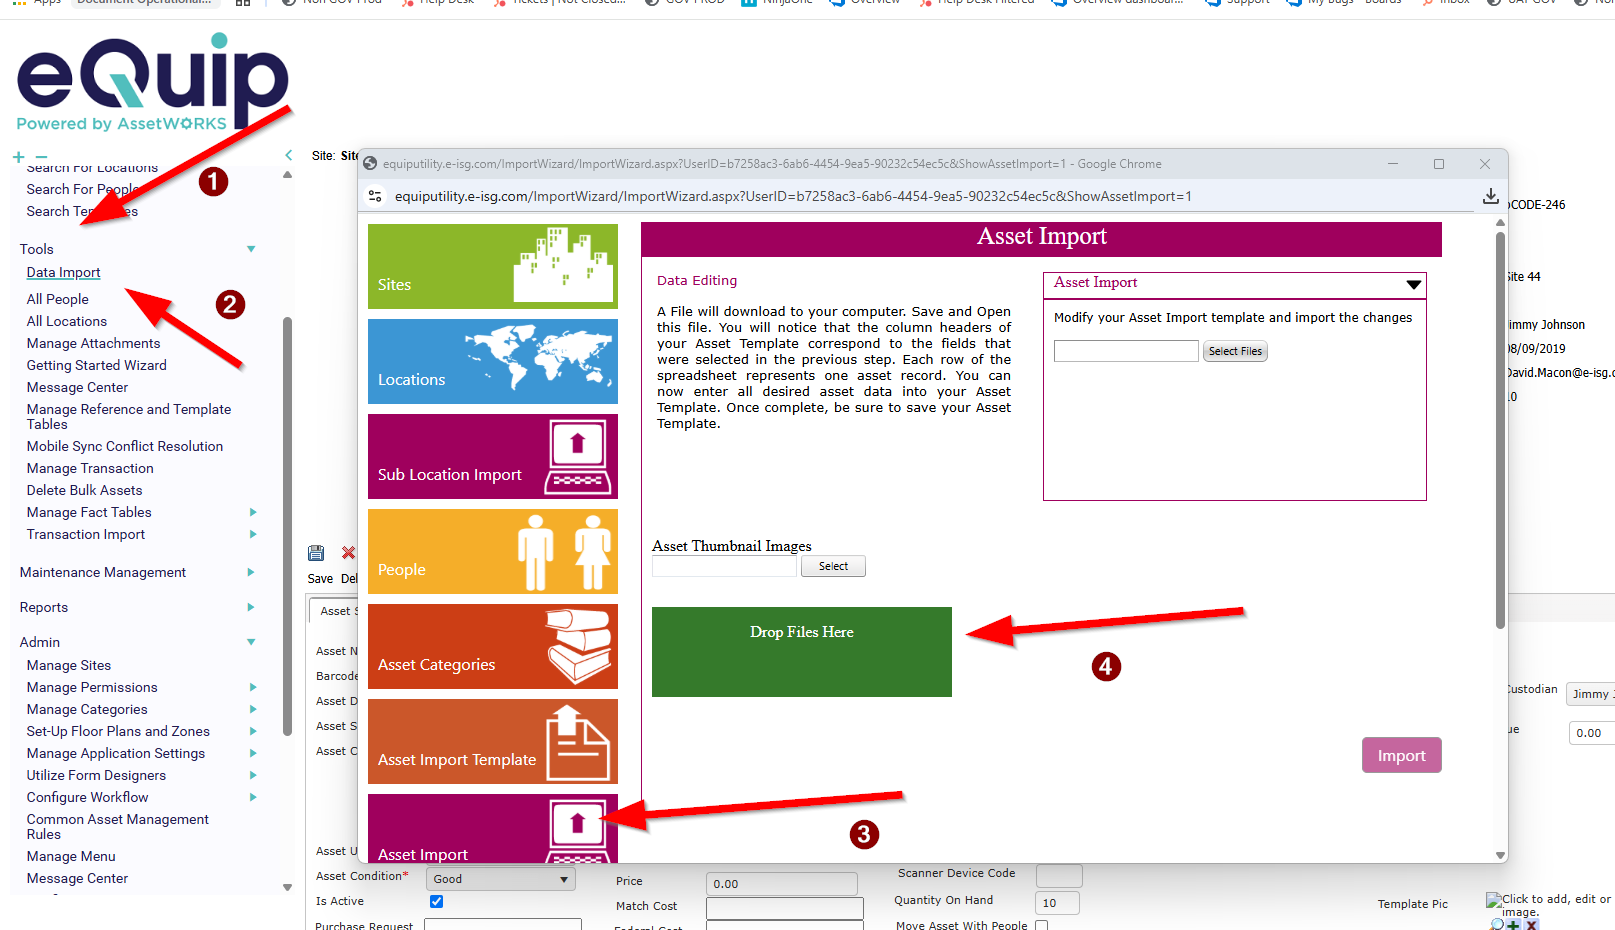
- 1 – Tools menu
- 2 – Data Import
- 3 – Asset Import
- 4 – Green upload area for images
Step 2 – Attach Images to Assets After uploading, the images are stored in eQuip but are not yet linked to assets.
- Generate or use an Asset Import Template
- Go to Tools → Data Import → Asset Import Template
- Select Advanced or Expert to expose additional fields
- Add the required field:
- ThumbNailImage
- Ensure this field appears in the right-hand column of the template
- Populate the spreadsheet:
- Include an identifier such as Asset ID or Barcode
- Enter the image file name in the ThumbNailImage column
- Import the file:
- Use Update mode for existing assets
- Upload via Tools → Data Import → Asset Import
Helpful Tip If you are unsure of the correct file name:
- Go to Reports → Access Standard Reports
- Run the Thumbnail Image report
- Copy and paste the file names into your spreadsheet
Alternate Option – Manual Attachments If you only need to add a few images, you can attach them manually:
Key Notes
- The ThumbNailImage field must be included in the right-hand column of the template
- Do not rename column headers, as this may cause import errors [help.asset...rksusa.com]
- Image file names must match exactly what was uploaded
Please feel free to reach out if you would like help reviewing your template before import. I’m happy to assist!